Magento 1 Installation
There are several ways to install and manage the Magento 1 extension. On this page you will find several ways to install, update, and uninstall the extension. We recommend using the magento connect manager whenever possible. This is generally safer and allows you to install straight from the magento admin panel. If this option is unavailable, explore the manual option or another method you believe will be most effective for your setup.
You will need a Springbot account to complete any of the install methods. The Account is free to register but our products are offered as a paid subscription. If you do not have springbot credentials and have not spoken to one of our e-commerce marketing experts, please schedule a quick consultation.
Download
Quick Find
Install
Install using Magento Connect and manual downloadInstall Manually
Update
Update using Magento ConnectUpdate Manually
Uninstall
Uninstall using Magento ConnectUninstall Manually
Install
Installing with magento connect has several steps. You can install the certified copy by downloading a copy here and uploading it directly to your magento admin panel. To complete the install phase you will need a springbot account, access to your magento admin panel, and some form of uploading or managing files on your server.
Download from here
- Download the latest plugin version by clicking one of the links above. Make sure to use the .TGZ link when installing via the magento connect manager.
- log in to your Magento admin panel
- Navigate to System -> Magento Connect -> Magento Connect Manager
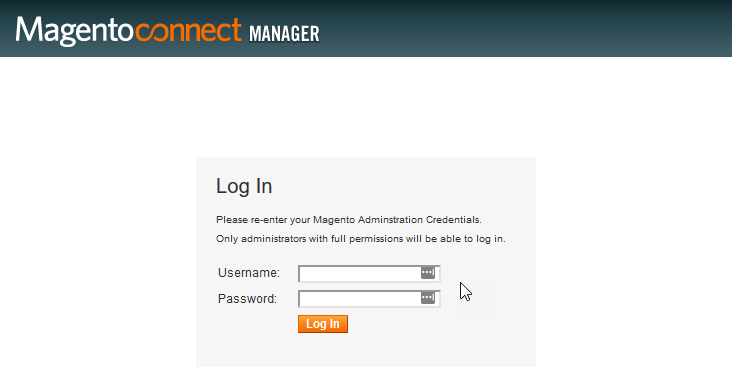
- You will be prompted with a page that requires you to log in again. Simply use your magento admin credentials on this page as well.
- On this page, under the Direct package file upload section, click on "choose file" or "browse" and upload the .tgz file you downloaded here and select upload.
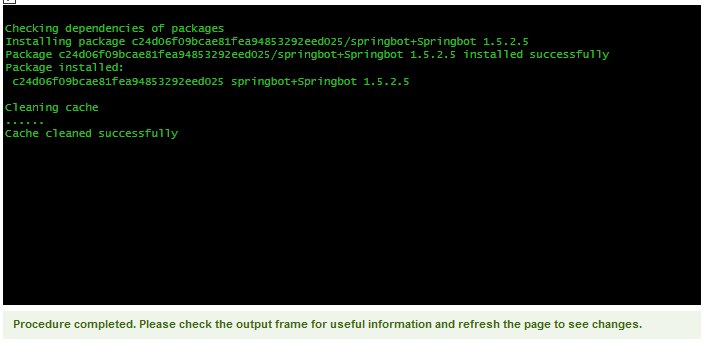
- Magento should automatically upload the files, enable the extension, and clear your cache.
- Once you have successfully installed, you should see a notification and a springbot link in your admin menu. Simply click the green banner or select sync from the springbot drop-down menu and log in using your springbot credentials.
- Once you see the syncing image, everything is complete.
NOTE: On the Magento Connect Manager page you will see a setting for "Put store on maintenance mode", we highly recommend using this feature. It presents customers with a page showing the "site under maintenance" banner while the install runs. Make sure to disable it once you have completed the install.


Install Manually
- Download the latest plugin version by clicking one of the links above.
- Once the download is complete, unzip the file.
- Using ftp/sftp: Connect to your server and navigate to the root web/magento directory. NOTE: On most systems your magento files will be under 'var/www/html/'. if you aren't sure or the folder is empty, contact your hosting provider to ask what your default web directory is.
- Copy the "app" and "skin" folder from the unzipped file you downloaded in the previous step into your Magento root directory. NOTE: This should not override any existing files if you are installing for the first time.
- Once finished copying, simply log in to the magento admin panel to clear the cache and re-index your pages.
- Once you have successfully installed, you should see a notification and a springbot link in your admin menu. Simply click the green banner or select sync from the springbot drop-down menu and log in using your springbot credentials.
- Once you see the syncing image, everything is complete.
Update
The Springbot team is always working on improvements and new features for our customers. Sometimes you will need to update your plugin to properly utilize these new features. This section focuses on how to update your plugin to the latest version we offer.
Update with Magento Connect
This method will only work if you originally installed using magento connect. For any other type of installation please see our section on Updating Manually.
- log in to your Magento admin panel
- Navigate to System -> Magento Connect -> Magento Connect Manager
- You will be prompted with a page that requires you to log in again. Simply use your magento admin credentials on this page as well.
- On the Magento Connect Manager page you will see a setting for "Put store on maintenance mode", we highly recommend using this feature. It presents customers with a page showing the "site under maintenance" banner while the install runs. Make sure to disable it once you have completed the install.
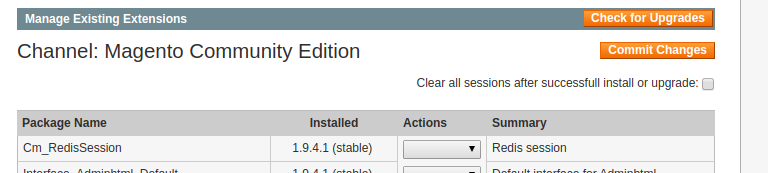
- On this page, next to Manage Existing Extensions you should see a button that says "Check for upgrades" click this button.
- Scroll down till you see the springbot extensions
- If there is a new update available, select whichever version you would like to upgrade to from the drop-down menu.
- Click the commit changes button and magento will update the plugin to the version you have chosen.
Update Manually
Updating manually will require you to connect with sftp/ftp, ssh, or some other form of file manager. You will also need admin access to the Magento admin panel to clear the cache and re-index pages once you have finished.
- Download the latest plugin version by clicking one of the links above.
- Once the download is complete, unzip the file.
- Using whichever form of access you prefer: get to the root magento directory on your server. NOTE: On most systems your magento files will be under 'var/www/html/' if you aren't sure or the folder is empty, contact your hosting provider to ask what your default web directory is.
- Copy the "app" and "skin" folder from the unzipped file you downloaded in the previous step into your Magento root directory. This will overwrite your previous Springbot installation and add any new files you will need.
- Once finished copying, simply log in to the magento admin panel to clear the cache and re-index your pages.
Uninstall
These instructions can be used to safely uninstall and remove the springbot extension from the magento admin panel.
Uninstall using Magento Connect
- Log in to your Magento admin panel
- Navigate to System -> Magento Connect -> Magento Connect Manager
- You will be prompted with a page that requires you to log in again. Simply use your magento admin credentials on this page as well.
- On the Magento Connect Manager page you will see a setting for "Put store on maintenance mode", we highly recommend using this feature. It presents customers with a page showing the "site under maintenance" banner while the installer runs. Make sure to disable it once you have completed the uninstall.
- Under Manage Existing Extensions look for the springbot extension.
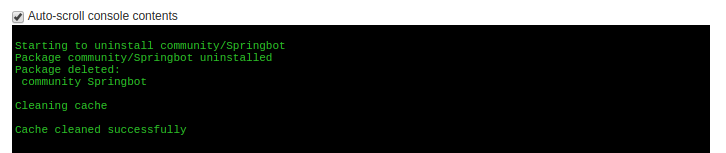
- Once you have located it, select uninstall from the drop-down menu on the right.
- Click commit changes.
- Once the process has been completed successfully, you should see the following output on your console window at the bottom.

Uninstall Manually
Uninstalling manually will require you to connect with sftp/ftp, ssh, or some other form of file manager. You will also need admin access to the Magento admin panel to clear the cache and re-index pages once you have finished.
- Using whichever form of access you prefer: go to the root magento directory on your server. NOTE: On most systems your magento files will be under 'var/www/html/'. if you aren't sure or the folder is empty, contact your hosting provider to ask them what your default web directory is.
- From the root magento directory, remove the following files and folders
- app/code/community/springbot
- app/etc/modules/springbot.xml
- app\design\adminhtml\default\default\layout\springbot_main.xml
- app\design\adminhtml\default\default\tamplate\springbot
- app\design\frontend\base\default\layout\springbot_main.xml
- app\design\frontend\base\default\tamplate\springbot
- skin/adminhtml/default/default/springbot
- Once you have removed everything, simply log in to the magento admin panel to clear the cache and re-index your pages.